If you’ve ever had a cabinet door that won’t sit straight, a drawer that sticks halfway open, or trim that suddenly shows a gap where there wasn’t one before, you already know how annoying small woodwork problems can be. They look minor. They rarely stay that way.
Millwork and cabinet repairs fall into that frustrating category of home maintenance that many people ignore for too long. I get it. A crooked door doesn’t feel urgent. But loose hinges turn into stripped screw holes, small finish chips turn into swollen edges after moisture gets in, and a tiny seam in trim can turn into a full split after a season change.
The good news is that a lot of these problems are fixable. Some are simple. Some are worth calling in help for. The trick is knowing which is which.
What “millwork” actually means
Homeowners hear the word millwork and sometimes assume it means only fancy custom wood details. It’s broader than that.
Millwork usually includes the finished wood or wood-based pieces built into a home, such as:
- baseboards
- crown molding
- window and door casings
- wall paneling
- stair parts
- built-in shelves
- fireplace surrounds
- cabinet faces, trim, and decorative panels
Cabinetry overlaps with millwork, but it deserves its own attention because cabinets combine structure, finish work, hardware, and alignment. A cabinet can look like a simple box until one drawer front shifts by a quarter inch. Then suddenly it’s all you can see.
The most common cabinet and millwork problems
A lot of repair calls come down to a short list of familiar issues.
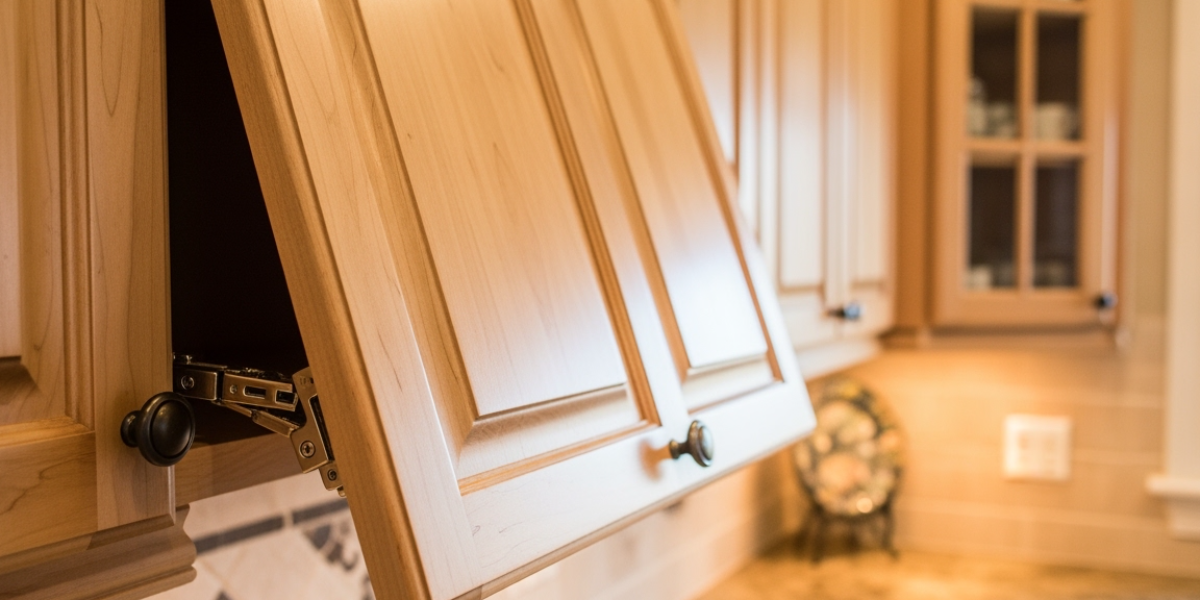
Misaligned cabinet doors and drawers
This is probably the one people notice first. Doors hang too low, rub against each other, won’t close evenly, or leave odd gaps. Drawers scrape, drift open, or jam.
Sometimes the fix is as simple as a hinge adjustment. Sometimes the cabinet box has shifted, the screws have stripped out, or the drawer slides are worn.
Loose trim or separated joints
Baseboards, crown molding, and casings can pull away from the wall or ceiling over time. Wood moves. Houses settle. Seasonal humidity doesn’t help.
If the gap is tiny and stable, cosmetic repair may be enough. If pieces are actually loose, the fasteners or substrate may need attention first.
Scratches, dents, chips, and worn finishes
Daily use beats up woodwork. Vacuum bumps, pet claws, chair backs, cleaning chemicals, and plain old traffic leave marks.
Paint-grade trim is usually easier to patch than stained wood. Stained wood repairs can be done well, but color matching is where many DIY attempts go sideways.
Water damage
This one matters. Sink base cabinets, bathroom vanities, window trim, and laundry room millwork are the usual victims.
A little water spotting is one thing. Swollen particleboard, peeling veneer, soft corners, mold, or delamination are another. Once a cabinet box loses its structure, the repair gets more serious fast.
Cracked caulk, open seams, and finish failure
You might see hairline cracks at trim joints, peeling paint at corners, or cloudy, worn cabinet finishes near handles and sinks. These often start as cosmetic problems, but they can expose the material underneath to more wear.
Start with diagnosis, not tools
This is the part people skip. They see a crooked door and grab a screwdriver. Fair enough. But good repairs start with one question: what caused this?
A few examples:
- If a cabinet door is sagging, is the hinge loose, bent, or mounted into stripped wood?
- If trim is separating from the wall, did seasonal movement cause it, or is the wall itself shifting?
- If a drawer sticks, is the slide failing, is the box out of square, or is the drawer bottom sagging?
- If the finish is bubbling, did moisture get in from above, below, or behind?
Spend five minutes inspecting before doing anything else.
A simple inspection checklist
Look for:
- loose screws
- stripped screw holes
- swollen edges
- soft or crumbly material
- cracked joints
- gaps that are growing, not just visible
- rust on hinges or fasteners
- signs of a leak nearby
- repeated rubbing marks on doors or drawer fronts
If you find moisture, stop there and trace the source. Repairing damaged millwork without fixing the leak first is a waste of time.
Know your materials before you repair them
Not all cabinets and trim behave the same way. This matters a lot.
Solid wood
Solid wood can be repaired, filled, sanded, glued, and refinished fairly well. It also moves with humidity, so small seasonal changes are normal.
Plywood
Plywood cabinet boxes are generally sturdier than particleboard and hold screws better. Surface damage is often repairable, though exposed layers can chip.
MDF
Medium-density fiberboard is common in paint-grade trim and cabinet doors. It gives a smooth finish, but it hates water. Once it swells badly, it usually doesn’t return to its original shape.
Particleboard
This is common in lower-cost cabinet boxes and shelving. It’s especially vulnerable to moisture and stripped fasteners. If it has swelled or crumbled, patching only buys time.
Veneer, laminate, and thermofoil
These finishes can look good for years, then suddenly chip, peel, or lift. Minor edge repairs are possible. Large failures are harder to make invisible.
That’s why two cabinets with the same scratch may need completely different fixes.
Repairs many homeowners can handle
There’s a decent middle ground between “ignore it” and “replace everything.”
Adjusting European-style hinges
Many modern cabinet hinges are adjustable in three directions. A screwdriver can often fix uneven gaps, rubbing doors, or doors that don’t close flush.
Make small changes. Quarter-turns matter. Adjust one hinge, then the other, and step back to look at the reveal around the door.
If the screw spins without tightening, the hole may be stripped. At that point, simple adjustment is no longer the real fix.
Tightening hardware
Loose pulls, knobs, drawer slide screws, and hinge plates are low-risk repairs. Just don’t overtighten into engineered wood. That’s how perfectly normal maintenance turns into a stripped hole.
Filling small nail holes and paint-grade dents
For painted trim, small holes and dents can often be filled, sanded smooth, and touched up. Use a filler made for interior woodwork, not just whatever tube is in the garage from a drywall project three years ago.
Recaulking small trim gaps
Tiny separations between painted trim and the wall can often be cleaned out and recaulked. Use paintable caulk sparingly. Too much leaves a smeared look that catches light in all the wrong ways.
Cleaning and touching up minor finish wear
Grease buildup around cabinet pulls can make finishes look worse than they are. Start by cleaning gently with a product safe for the finish. For minor scratches, color-matched touch-up markers or wax sticks can help, especially on darker stains.
This is where restraint helps. A decent touch-up that blends is better than a “perfect” repair that draws the eye.
Repairs that usually need a professional
Some jobs look easy until you’re halfway in.
Water-damaged cabinet boxes
If the sides, floor, or bottom rails of a cabinet are swollen, soft, or coming apart, structural repair may be needed. Sink base cabinets are the classic example.
The challenge is not just replacing damaged material. It’s doing it without wrecking surrounding cabinets, countertops, plumbing connections, or finished end panels.
Broken drawer boxes and slide failures
A drawer that has pulled apart at the joint or torn free from a slide can often be repaired, but the details matter. Slide types vary. Mounting positions matter. So does drawer squareness.
A sloppy drawer repair rarely stays fixed.
Veneer repairs and finish matching
Replacing chipped veneer, patching stained wood, or blending a new finish into an old one is harder than it looks. It takes color matching, sheen matching, and surface prep. On visible cabinet fronts, this is where professional work earns its keep.
Custom trim profile repair
If a chunk of casing or crown is missing, you may need an exact profile match. In older homes especially, that profile might not be sitting on a shelf at the local hardware store.
Warped doors and serious alignment issues
Sometimes the problem isn’t the hinge. The door itself has twisted, the cabinet box has shifted, or the mounting surface is no longer stable. At that point, adjustment alone is just chasing the symptom.
Repair or replace? The question people ask too late
I’ve seen homeowners wrestle with this longer than they need to. Here’s the plain version: if the core structure is sound, repair is often the smarter move. If the material has failed, replacement may save money and aggravation.
Repair usually makes sense when:
- the damage is isolated
- the cabinet box is solid
- the style still fits the room
- the finish can be matched closely
- the problem is hardware, alignment, or surface-level wear
Replacement starts making more sense when:
- particleboard has swollen badly
- multiple components are failing at once
- mold or long-term water damage is present
- doors and drawer fronts are warped beyond adjustment
- replacement parts are unavailable and repairs would be highly visible
There’s also the visual factor. A perfect functional repair can still look off if one new component doesn’t match aged surrounding woodwork.
What a professional repair usually includes
Homeowners sometimes picture repair work as “tighten a few screws and add some filler.” Sometimes, yes. Often it’s more methodical.
A solid repair process usually includes:
- inspecting the root cause
- stabilizing the surrounding material
- repairing or replacing damaged sections
- resetting hardware and alignments
- blending the finish
- checking operation after the repair cures or settles
For cabinets, that may mean adjusting hinges, reinforcing mounting points, rebuilding drawer attachment areas, replacing slides, patching finish damage, and fine-tuning reveals so everything reads straight.
For millwork, it may involve re-fastening loose pieces, resetting miters, filling gaps, sanding, caulking, priming, and repainting or staining.
The last 10 percent is what separates “fixed” from “looks fixed.”
How to prevent damage in the first place
This part is not glamorous, but it saves money.
Watch humidity
Wood movement is normal. Wild indoor humidity swings are not great for trim joints, cabinet doors, and drawer fit. Bathrooms, kitchens, and basements are where trouble usually starts.
Keep water where it belongs
Check under sinks. Look around faucets, dishwashers, refrigerators, and windows. A slow leak can wreck cabinetry long before it becomes obvious.
Don’t slam doors and drawers
Soft-close hardware has spoiled many of us, and honestly, I support that. Repeated slamming loosens fasteners and stresses joints.
Clean finishes gently
Avoid harsh cleaners, abrasives, and soaking woodwork with water. A damp cloth and a finish-safe cleaner usually do the job.
Tighten things early
A loose hinge or pull is five minutes of maintenance. Wait six months and now you may be repairing stripped holes or misalignment damage too.
A room-by-room way to spot trouble early
You don’t need a formal inspection. Just a quick pass every few months.
Kitchen
Check sink base cabinets, drawer slides, door alignment, and finish wear near the stove and sink.
Bathroom
Look for swelling at vanity toe kicks, peeling edges, and trim damage near tubs and showers.
Laundry room
Watch for leaks, vibration-related hardware loosening, and moisture damage around utility sinks.
Living areas
Inspect built-ins, window casings, and baseboards for gaps, dents, and movement.
Entryways and stairs
These areas take a beating. Look for loose trim, scuffed corners, and rail or newel movement.
A few mistakes to avoid
Some repair attempts create more work than the original problem.
- Painting over swollen material without fixing the cause
- Forcing stripped screws back into the same hole
- Using too much caulk to hide loose trim
- Sanding through veneer
- Using the wrong filler on stained wood
- Ignoring cabinet box movement while adjusting only the door
- Replacing one hinge or slide with a mismatched type
And one more: don’t sand old painted millwork without thinking about paint age and safety. In older homes, lead-safe practices matter.
The bottom line
Millwork and cabinet repairs are rarely just about appearance. They affect function, durability, and how finished a room feels. A drawer that sticks every day will wear on you. So will trim gaps you keep noticing from across the room.
The encouraging part is that many issues can be fixed without tearing everything out. Start by figuring out the real cause, identify the material you’re working with, and be honest about whether the repair is cosmetic, structural, or moisture-related.
If it’s a simple adjustment, do it early. If it involves swelling, finish matching, broken structure, or custom woodwork, getting skilled help is usually the smarter call.
Small repairs tend to stay small only when someone deals with them. That’s the whole game.